Sunday, November 25, 2007

How to stop getting "Preparing to install" Windows Installer message when you start Visual Basic 6.0?

Ever got this message "Preparing to install... " when you are trying to launch your Visual Basic 6?

I had this problem when I have multiple user accounts in my machine, I'll get this message as VB6 was installed using another user account. There was a workaround for this, if you know the username and password for the user account who installed VB6.

1) Just right-click on the VB6 program, select "Run as..."

2) Enter the username & password who installed the VB6.

But it's kinda frustrating, coz everytime you need to run as another user for using VB6.

Finally, my colleague has taught me a way to fix this.

1) Go to C:\Windows\System32 folder, and look for msi.dll.

2) Rename the msi.dll to any other name.

3) Go to C:\Windows\System32\dllcache folder, and rename msi.dll too.

If you didn't do this step, the msi.dll in System32 folder will automatically be recreated.

If you couldn't find this dllcache folder, you may need to change a property in the Folder options.

In Windows Explorer --> Go to Tools menu --> Select Folder Options --> Click on View tab --> Uncheck the option "Hide protected operating system files (Recommended)".

4) Launch VB6, and now you are able to launch VB6 without getting the error message.

5) Rename the file to msi.dll in System32 folder and dllcache folder.

Done! ^_^

Tuesday, November 20, 2007

ModalPopup Extender

I always think it's really nice for some web sites to popup a dialog, while the background color fades out. It's actually quite easy to make it happen with ASP.NET Ajax Control Extender now. ^_^

Copy these classes to your css file:

.modalBackground
{
background-color:Gray;
filter:alpha(opacity=70);
opacity:0.7;
}

.modalPopup
{
background-color:#FFFFDD;
border-width:3px;
border-style:solid;
border-color:Gray;
padding:3px;
width:250px;
}

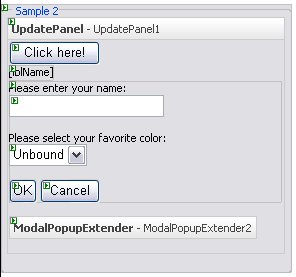
During design time, add the following controls to the web page.


In the HTML page, add these attributes to the ModalPopupExtender:


<ajaxToolkit:ModalPopupExtender 
id="ModalPopupExtender2"
runat="server"
OnOkScript="fnClickOK()"
CancelControlID="btnCancel1"
OkControlID="btnOK1"
DropShadow="true"
BackgroundCssClass="modalBackground"
PopupControlID="Panel2"
TargetControlID="btnClickToOpen">

For the popup Panel, define these attributes:


<asp:Panel 
id="Panel2"
runat="server"
style="display: none"
CssClass="modalPopup">

Create this function in javascript, if you want to use the server-side postback, otherwise you can just create a javascript function where you will perform something when the user clicks on OK button in the popup dialog.


function fnClickOK(sender, e)
{
__doPostBack(sender,e);
}


Set the OnClientClick event for the "Click here!" button and "OK" button in the Page_Load event.

protected void Page_Load(object sender, EventArgs e)
{
if (!IsPostBack)
{
btnOk1.OnClientClick = String.Format("fnClickOK('{0}','{1}')", btnOk1.UniqueID, "");
btnClickToOpen.OnClientClick = String.Format("fnClickOK('{0}','{1}')", btnClickToOpen.UniqueID, "");
}
}


Enter the codes in the btnOk1_Click & btnClickToOpen_Click event.

Call the ModalPopupExtender Show() method to popup the modal dialog.

protected void btnOk1_Click(object sender, EventArgs e)
{
lblName.Text = "Hello, " + txtName.Text +
". You have selected " + DropDownList1.Text;
}

protected void btnClickToOpen_Click(object sender, EventArgs e)
{
DropDownList1.Items.Clear();
DropDownList1.Items.Add("Red");
DropDownList1.Items.Add("Purple");
DropDownList1.Items.Add("Black");
ModalPopupExtender2.Show();
}

* If you want to refer to an external javascript file, you just need to add this line of code in the HTML file:


<script language="javascript" type="text/javascript" src="AjaxPrototype.js"></script>

Collapsible Panel

I've just learnt how to do this collapsible panel with ASP.NET Ajax Control Extender, it's actually quite simple. ^_^

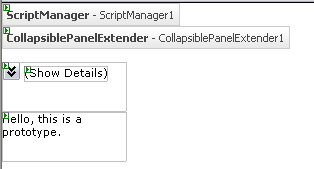
At the beginning, create these controls on the screen:

Control Control Name
ScriptManager ScriptManager1
CollapsiblePanelExtender CollapsiblePanelExtender1
Panel TitlePanel
Panel ContentPanel
Image Image1
Label Label1

Define these CSS classes:

.collapsePanel
{
width:640px;
height:0px;
background-color:White;
overflow:hidden;
}

.collapsePanelHeader
{
width:640px;
height:20px;
background-color:Silver;
font-weight:bold;
float:left;
padding:5px;
cursor:pointer;
vertical-align:middle;
}

Remove the width and height for the TitlePanel and ContentPanel, and set the CssClass attribute:


TitlePanelcollapsePanelHeader
ContentPanelcollapsePanel

In the HTML page, add these attributes to the CollapsiblePanelExtender:


<ajaxToolkit:CollapsiblePanelExtender ID="CollapsiblePanelExtender1" 
runat="server" TargetControlID="ContentPanel"
ExpandControlID="TitlePanel"
CollapseControlID="TitlePanel"
Collapsed="true"
TextLabelID="Label1"
ExpandedText="Hide Details..."
CollapsedText="Show Details..."
ImageControlID="Image1"
ExpandedImage="Images/Expanded.gif" CollapsedImage="Images/Collapsed.gif"
SuppressPostBack="true">
</ajaxToolkit:CollapsiblePanelExtender>

It's done.


Sunday, November 11, 2007

ASP Spider - Free Web Hosting

URL: http://www.aspspider.com/

This is a ASP.NET web hosting with SQL Server Express, FREE version.

I've registered to this web hosting when I started to learn ASP.NET, it was quite hard for me to find other free web hosting at that time.

At the beginning, you are given 10MB disk space, where you can increase the disk quota up to 200MB.

The registration was closed for quite some time, and I just found out it's open again now. For those who are interested in getting this free web hosting, you may click on this link: Register Now

[Updated on 26 April 2008]
I just checked out the site, and found out the site is going to stop offering the free ASP.NET web hosting services starting 1 May 2008. I have to look for other free ASP.NET web hosting sites. :p

Friday, November 2, 2007

Liquid page layout using CSS

Reference to: MaxDesign - Liquid Layouts

I've been almost the whole week to do this simple task, to locate three buttons in the home page using CSS. I was using HTML table to organize the page layout, but found out using CSS makes the page load faster, thus I decided to learn CSS for my project. After about a week of research, finally I've found this, and it really saves me! This tutorial is very simple, you can just follow step by step and you'll get your page layout done.

There are some definitions regarding liquid layout and fixed-width layout, then you'll know which one you should be using.

Copy these to your css file:

   1: /* COLUMNS */
   2: #leftColumn
   3: {
   4: float: left;
   5: width: 30%;
   6: margin-left: 4%;
   7: text-align:center;
   8: display:inline;
   9: border:dotted 1px #ccc;
  10: }
  11:  
  12: #middleColumn
  13: {
  14: float: left;
  15: width: 30%;
  16: margin-left: 1%; 
  17: text-align:center;
  18: border:dotted 1px #ccc;
  19: }
  20:  
  21: #rightColumn
  22: {
  23: float: left;
  24: width: 30%;
  25: margin-left: 1%;
  26: text-align:center;
  27: border:dotted 1px #ccc;
  28: }
  29:  
  30: #footer
  31: {
  32: clear: both;
  33: text-align:center;
  34: border:dotted 1px #ccc;
  35: margin-top:1em;
  36: }
  37:  
  38: #leftColumn p, #middleColumn p, #rightColumn p, #footer p
  39: {
  40: margin: 2em;
  41: }


Include these codes in your HTML file:


   1: <div id="leftColumn">
   2: <p><img src="Images/bluehouse01_large.gif" 
   3: alt="Single Company Analysis" />
   4: <br />
   5: Option 1
   6: </p>
   7: </div>
   8:  
   9: <div id="middleColumn">
  10: <p><img src="Images/bluehouse02_large.gif" 
  11: alt="Group Companies Analysis"/>
  12: <br />
  13: Option 2
  14: </p>
  15: </div>
  16:  
  17: <div id="rightColumn">
  18: <p><img src="Images/bluehouse03_large.gif" 
  19: alt="Form C Data Search"/>
  20: <br />
  21: Option 3
  22: </p>
  23: </div>
  24:  
  25: <div id="footer">
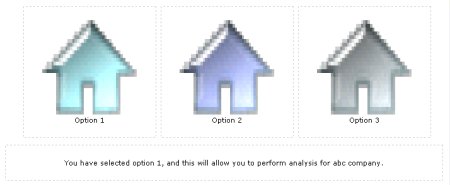
  26: <p>You have selected option 1, and this will allow you to perform analysis for abc company.
  27: </p>
  28: </div>

Then you'll get the output.

Rounded corners using CSS

Ever wonder how to make the rounded corners in your web site?

I've read about using images to make it, and some need javascripts. You can use ASP.NET AJAX tool for this rounded corners box. I just found this, where you don't need to use any images nor javascript, and it works.

Copy this to your css file. e.g. test.css

   1: /* ROUNDED CORNERS - Grey border */
   2: #xsnazzy h1, #xsnazzy h2, #xsnazzy p {margin:0 10px; letter-spacing:1px;}
   3: #xsnazzy h1 {font-size:2.5em; color:#fff;}
   4: #xsnazzy h2 {font-size:2em;color:#06a; border:0;}
   5: #xsnazzy p {padding-bottom:0.5em;}
   6: #xsnazzy h2 {padding-top:0.5em;}
   7: #xsnazzy {background: transparent; margin:1em;}
   8:  
   9: .xtop, .xbottom {display:block; background:transparent; font-size:1px;}
  10: .xb1, .xb2, .xb3, .xb4 {display:block; overflow:hidden;}
  11: .xb1, .xb2, .xb3 {height:1px;}
  12: .xb2, .xb3, .xb4 {border-left:1px solid #ccc; border-right:1px solid #ccc;}
  13: .xb1 {margin:0 5px; background:#ccc;}
  14: .xb2 {margin:0 3px; border-width:0 2px;}
  15: .xb3 {margin:0 2px;}
  16: .xb4 {height:2px; margin:0 1px;}
  17:  
  18: .xboxcontent 
  19: {
  20:     display:block; 
  21:     border:0 solid #ccc; 
  22:     border-width:0 1px;
  23: }

Copy this to the HTML file:


   1: <div id="xsnazzy">
   2: <b class="xtop">
   3: <b class="xb1"></b><b class="xb2"></b><b class="xb3"></b><b class="xb4"></b>
   4: </b>
   5: <div class="xboxcontent">
   6: <p><h2>This is an example of rounded corner box without using images or javascript.</h2></p>
   7: </div>
   8: <b class="xbottom">
   9: <b class="xb4"></b><b class="xb3"></b><b class="xb2"></b><b class="xb1"></b>
  10: </b>
  11: </div>

In order to use the css file, you need to include this line of code in the head block.


   1: <head>
   2: <link href="Test.css" rel="stylesheet" type="text/css" />
   3:     <title>Rounded Corners example</title>
   4: </head>


Then, you'll get the rounded corners box.


More information regarding the rounded corners:

* Snazzy Borders - This is where I got the codes for my example.

* Spiffy Corners - Another way to create anti-aliased corners without using images or javascript.

* CSS Rounded Corners 'Roundup' - A collection of techniques to create boxes with rounded corners using CSS. Here you'll find many different techniques.

* Nifty Corners - This technique creates rounded corners without images, but with javascript.

Thursday, November 1, 2007

Useful links for CSS

I just started to create my CSS file for my project, and just want to check out if there are any recommended ways of doing this right. I just did a simple search in code project site, and found a lot of related articles which are useful. (Well, more to read now....)

I'll add more to the list when I've found more information here.

1. Internet Explorer & CSS issues

2. Ten ways to speed up the download time of your web pages (some key points here, a must read article.)

3.  Ten CSS tricks you may not know (There are some tricks here that you shouldn't miss too)

4. CSS Help Pile - A huge pile of CSS-related tips, tricks & resources.

5. 53 CSS-Techniques You Couldn't Live Without (Here, you can learn the specific technique that you want to use in your web site. Another Must Read article.)

6. Layout Gala: a collection of 40 CSS layouts - Here you'll get some reference CSS layout sites.  

7. MaxDesign - Sample CSS Page Layouts (with step by step layout tutorial too)

8. CSSplay - There are some demos, menus, layouts, boxes examples.